Apache CloudStack is an open-source cloud infrastructure management platform that simplifies the deployment, management, and scaling of virtualized workloads.
In this guide, we will walk you through the process of creating a ubuntu template from the existing Virtual machine in KVM.
Follow the below steps mentioned in the Documentation to create the Template from the Volume.
Step 1:
- Launch a VM instance with the desired operating system, ensuring the presence of DHCP network and an LVM disk partition.
- For example, we created a VM in Ubuntu 20 with a DHCP network and a 20GB LVM partition. Additionally, we allowed the necessary ports to access the server publicly.
The Below mentioned steps is for centos and Ubuntu
Step 2:
- After successfully launching the VM, next perform the following steps based on the operating system:
CentOS:
~~~
yum update -y
Reboot
~~~
Ubuntu:
~~~
sudo -i
apt-get update
apt-get upgrade -y
apt-get install -y acpid ntp
reboot
~~~
Explanation:
- Install “acpid” for Advanced Configuration and Power Interface.
- Install “ntp” for Network Time Protocol.
- Configure the template network interface for DHCP:
For CentOS:
- Set the hostname for the server.
~~~
hostname localhost
echo “localhost” > /etc/hostname
~~~
Step 3:
- Install and configure Cloud-init on the server.
CentOS:
~~~
yum install -y cloud-init wget
~~~
Ubuntu:
~~~
apt-get install -y cloud-init wget
~~~
2. Set up cloud-init to dynamically identify the Cloudstack data source at runtime.
- To achieve this, specify the data source location for cloud-init by including a specific configuration in a file named “99_cloudstack.cfg” within the “/etc/cloud/cloud.cfg.d/” directory.
~~~
datasource_list: [ ConfigDrive, CloudStack, None ]
datasource:
CloudStack: {}
None: {}
~~~
3. Enable password management:
- When Cloudstack is connected to the “cloud-init set_passwords” tool, it can automatically give a password to each new virtual machine created from the main template. Consequently, this enhances the efficiency of the setup process. Additionally, this also makes it possible to change the user’s password using a visual interface.
- Enable set_passwords module on every boot.
- By default, the set_passwords module will run only on the first boot. However, we need to configure it to run during every boot.
Command:
~~~
sudo sed -i s/” – set[_|-]passwords”/” – [set_passwords, always]”/g /etc/cloud/cloud.cfg
~~~
4. Specify the managed user:
- Cloudstack can create a user account, set its password, and modify the password as necessary. To enable this functionality, you must modify the settings in a file named “80_user.cfg” found in the “/etc/cloud/cloud.cfg.d/” directory.
- Kindly Utilize the following configuration:
- If there is an existing sudo user, you can update the username in the “name” section. Alternatively, if there is no sudo user, you can use the name “root” in the “name” section.
~~~
system_info:
default_user:
name: root
lock_passwd: false
sudo: [“ALL=(ALL) NOPASSWD:ALL”]
disable_root: 0
ssh_pwauth: 1
~~~
5. Disable Cloud-init regenerating host certificates:
~~~
echo “ssh_deletekeys: false” > /etc/cloud/cloud.cfg.d/49_hostkeys.cfg
~~~
6. Configure disk partition:
- Cloud-init has the capability to automatically detect and resize one or more existing partitions upon reboot. To enable this functionality, the first step is to install the Growpart module.
For CentOS:
~~~
yum install cloud-utils-growpart -y
~~~
For Ubuntu:
~~~
apt-get install cloud-initramfs-growroot -y
~~~
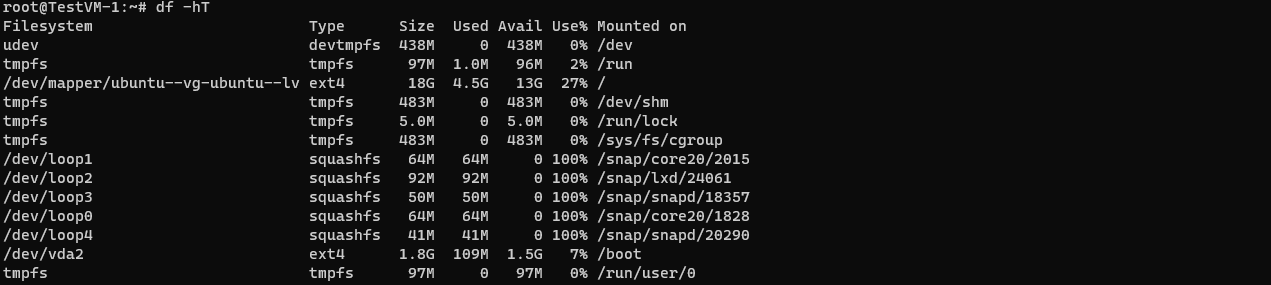
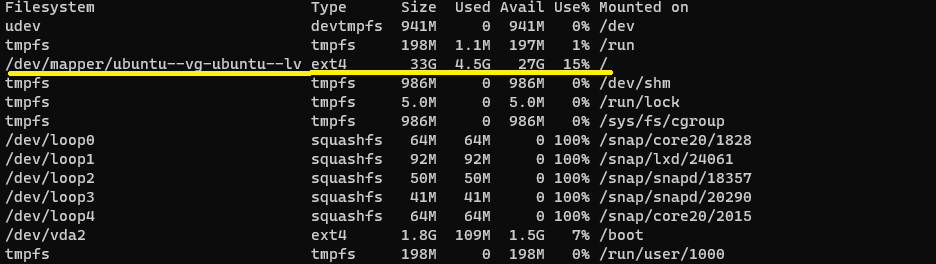
- Once we have installed the growpart in the VM, we then need to check the root disk setup. Based on that, we are going to configure it.
- Locate the root partition by using the “lsblk” command,

- If the disk partition setup is like in the above image,then use the growpart as below by defining only the root(vda2) partition in “/etc/cloud/cloud.cfg.d/50_growpartion.cfg”
~~~
growpart:
mode: auto
devices:
– /dev/vda2
ignore_growroot_disabled: false
~~~
- If the output of the “lsblk” is like in the below screenshot,use the growpart as below by defining the empty(vda1), /boot(vda2) and root /(vda3),

~~~
growpart:
mode: auto
devices:
– “/dev/vda1”
– “/dev/vda3”
ignore_growroot_disabled: false
~~~
- To extend the physical volume, volume group, and root LVM section, employ the following configuration. Locate the LVM using the command lvdisplay. The output is presented as follows:
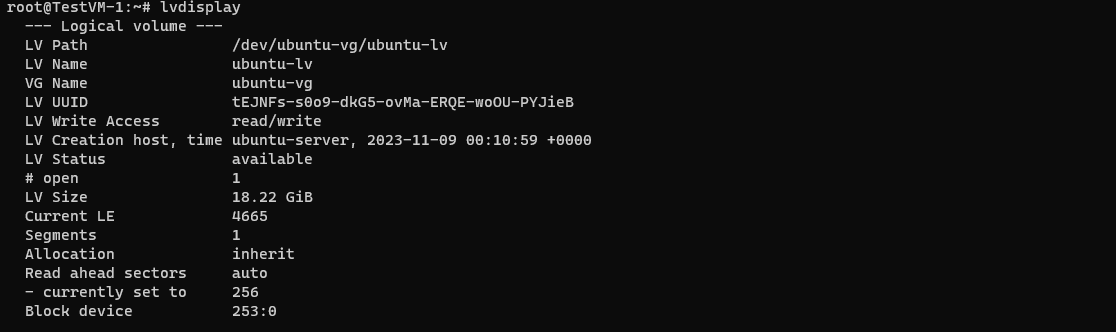
- From the output of the above mentioned screenshot, in our scenario,the LV path is :/dev/ubuntu-vg/ubuntu-lv and the “/” root partition is (/dev/vda3).
- Define partition configurations in “/etc/cloud/cloud.cfg.d/51_extend_volume.cfg” based on the file system of the root partition.
~~~
runcmd:
– [ cloud-init-per, always, grow_VG, pvresize, /dev/vda3 ]
– [ cloud-init-per, always, grow_LV, lvresize, -l, ‘+100%FREE’, /dev/ubuntu-vg/ubuntu-lv ]
– [ cloud-init-per, always, grow_FS, resize2fs, /dev/ubuntu-vg/ubuntu-lv ]
~~~
NOTE:If the file system of the “/” is xfs then use xfs_growfs or if it is ext4 then use resize2fs
7.Enable autoresize on every boot:
- By default cloud-init runcmd module executes defined commands on first boot only.
- If both runcmd and user-scripts modules are configured to run on every boot then only all the commands will run on every boot.
~~~
sudo sed -i s/” – runcmd”/” – [runcmd, always]”/g /etc/cloud/cloud.cfg
sudo sed -i s/” – scripts-user”/” – [scripts-user, always]”/g /etc/cloud/cloud.cfg
~~~
Step 4:
- SSH Configuration:
- Enable Direct root login in SSH configuration
~~~
Permitrootlogin yes
~~~
2. Start & Enable the Cloud-int services:
Commands:
~~~~~~~
Enable the service:
systemctl enable cloud-final.service &&
systemctl enable cloud-init.service &&
systemctl enable cloud-config.service &&
systemctl enable cloud-init-local.service
Start the service:
systemctl start cloud-final.service &&
systemctl start cloud-init.service &&
systemctl start cloud-config.service &&
systemctl start cloud-init-local.service
Status of the service:
systemctl status cloud-final.service &&
systemctl status cloud-init.service &&
systemctl status cloud-config.service &&
systemctl status cloud-init-local.service
~~~~~~~~
3. VM Hypervisor
- If the VM is running in the KVM hypervisor .
- Install the KVM tools, qemu-guest-agent and start the service
~~~
systemctl enable qemu-guest-agent &&
systemctl start qemu-guest-agent &&
systemctl status qemu-guest-agent
~~~
- If the VM is running in the Xenserver
- Install the Xenserver tools, xe-guest-utilities and start the service
~~~
systemctl enable xe-daemon.service &&
systemctl start xe-daemon.service &&
systemctl status xe-daemon.service
~~~
In some case,if any of the user-data given the disk resize will not be executed.So in order to overcome this,we need to run a script at every boot.
Create a file as mentioned below,
~~~
vi /var/lib/cloud/scripts/per-boot/runcmd
~~~
Add this script in the above created file:
~~~
#!/bin/sh
pvresize -y -q /dev/vda3
lvresize -y -q -r -l +100%FREE /dev/ubuntu-vg/ubuntu-lv
xfs_growfs /dev/ubuntu-vg/ubuntu-lv
exit 0
~~~
Change the permission to execute
~~~
chmod +x /var/lib/cloud/scripts/per-boot/runcmd
~~~
Step5:
Cleanup Process:
After finishing all tasks, it is essential to remove all executed commands on the server. Failing to clear these commands will result in them being displayed in the history section when creating a new VM from the template.
Commands:
~~~
rm -rf /var/lib/cloud/data/ /var/lib/cloud/handlers/ /var/lib/cloud/instance /var/lib/cloud/instances/ /var/lib/cloud/seed/ /var/lib/cloud/sem/
rm -rf /etc/sudoers.d/*
rm -f /etc/udev/rules.d/70*
rm -f /var/lib/dhcp/dhclient.*
rm -f /etc/ssh/*key*
cat /dev/null > /var/log/wtmp 2>/dev/null
logrotate -f /etc/logrotate.conf 2>/dev/null
rm -f /var/log/*-* /var/log/*.gz /var/log/*.1 2>/dev/null
truncate -s 0 /var/log/* &> /dev/null
truncate -s 0 /var/log/*/* &> /dev/null
truncate -s 0 /var/log/*/*/* &> /dev/null
truncate -s 0 /var/log/*/*/*/* &> /dev/null
> /root/.bash_history
history -c
~~~
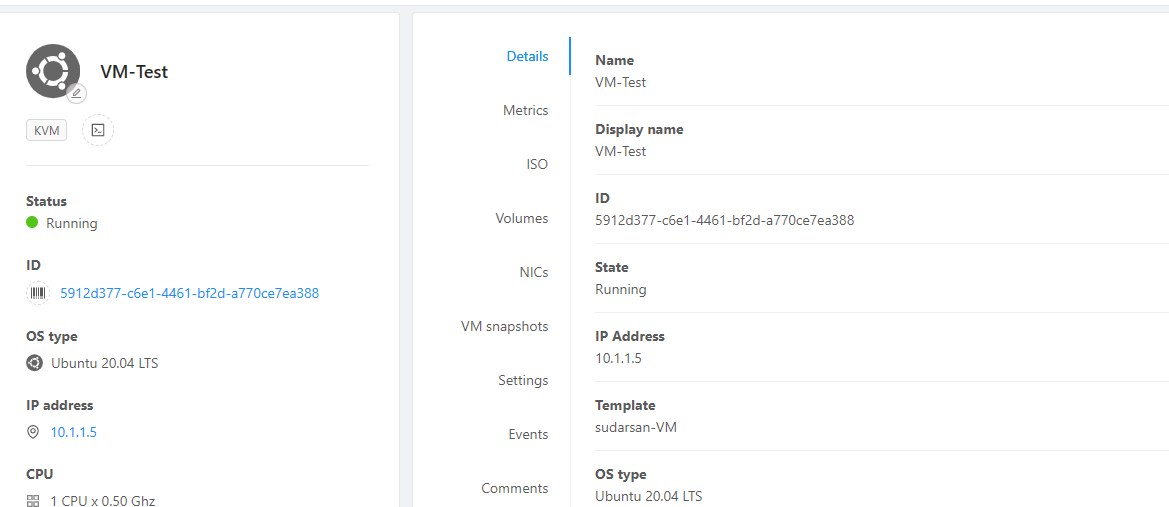
Creating a Template from an Existing Virtual Machine
- We’ve set up the required components in the virtual machine. Now, it’s time to turn this VM into a template.
- There are two methods for creating a template, and we’re going to use the one that involves creating a template from an existing virtual machine using the Volume.
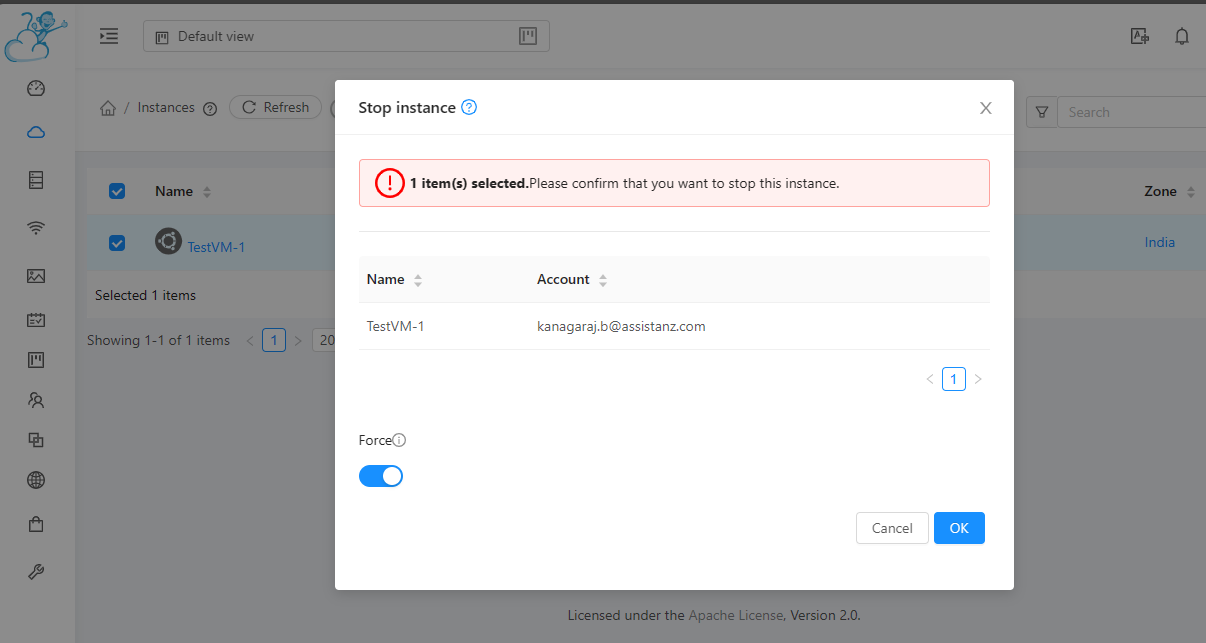
- After making the necessary modifications to the running VM, it needs to be stopped.
- Please be patient as the VM may take some time to stop. Wait until the VM is completely stopped.
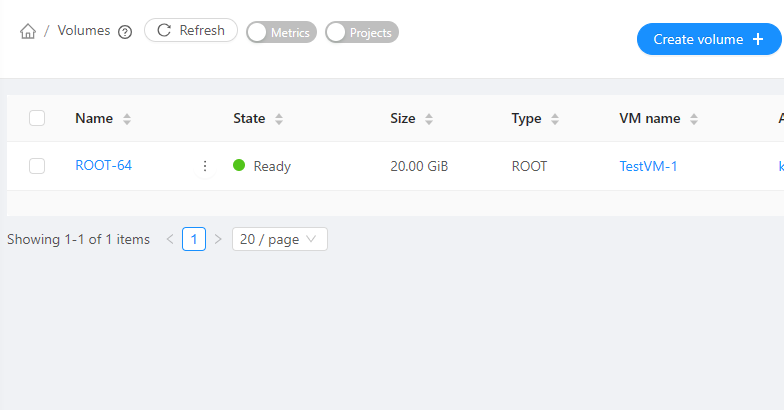
- Navigate to the “View Volumes” options and choose the Volume with the “ROOT” type.
- Select the option to create a template by clicking on the corresponding icon,
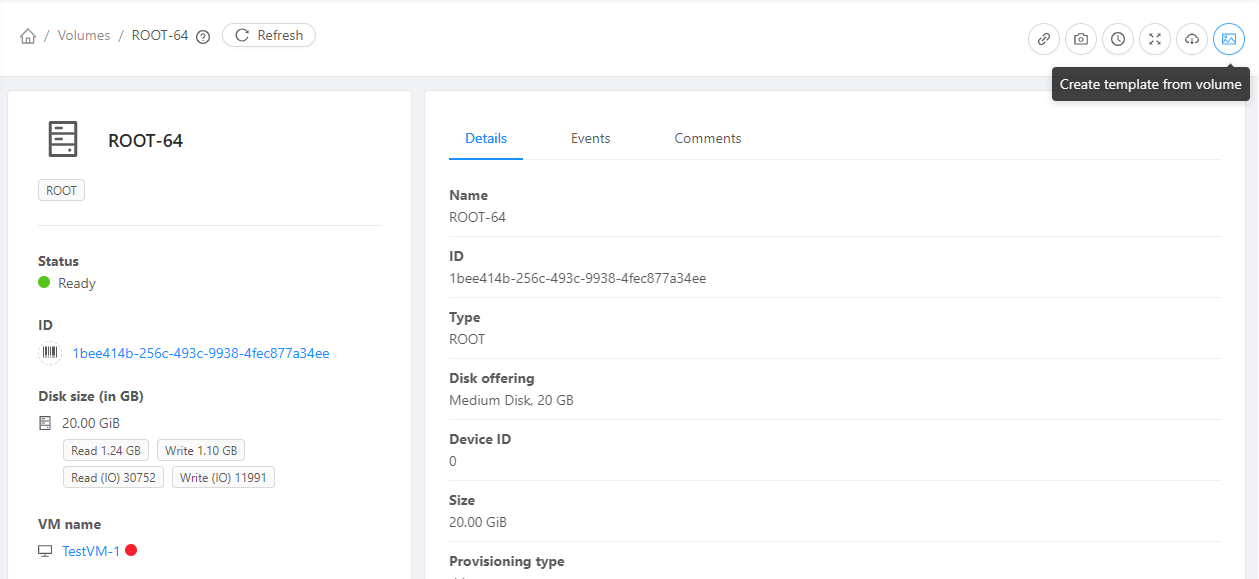
- Then proceed to update the following details:
- Name : Provide a name for the volume; in this case, I’ve named it “ubuntu20 Template.”
- Description : Include a description for the volume, outlining its purpose or content—for example, “Ubuntu20 with Apache.”
- OS type : Specify the operating system (OS) type. In CloudStack, it’s crucial to accurately select the OS type associated with the volume. In this instance, we’ve chosen “ubuntu20” as the OS type.
- Public: For the “Public” setting, opt for “Yes” if you want to make this template accessible to all users within the CloudStack installation. This means the template will be visible in the Community Templates list.
- Password Enabled: If your template includes the CloudStack password change script, select “Yes” for “Password Enabled.” This option is applicable when adding password management to your templates.

- After updating the required parameters, click “OK.” The template creation process will commence, and it will take some time to complete. Please be patient during this period.
- The template has been successfully created, and now it’s time to generate a VM from this template.
- Navigate to the “Instance” section, and beside the zone, you’ll find the “Template/Iso” option. Within this, locate the recently created template and select it.

- Proceed by choosing the desired network and disk configurations according to your specifications. Then, click on the “Launch Instance” option to initiate the creation of the VM using our template
- Upon successful VM creation, you will receive a notification indicating the completion of the process along with the password for the newly created VM.
- Subsequently, assign a public IP address to the VM, and configure the firewall to allow access through the desired ports. This step ensures that you can access and interact with the VM as needed.
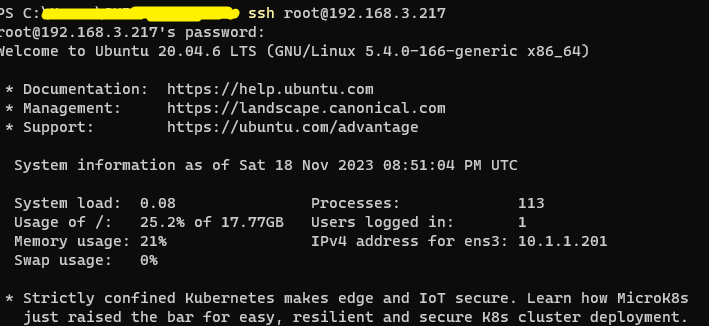
- Now, we can access the Server SSH by using the assigned public IP address and the newly generated Password displayed in the Cloudstack UI.
- The recently created VM will be automatically assigned a Private IP address, and the disk resizing has been successfully added to the newly created VM.
- The virtual machine we initially created had a root disk of only 20GB. However, when I created a new VM using the template I made, I selected a 35GB root disk size. Consequently, the VM was created with the specified 35GB root disk
Congratulations! You have successfully created a template from the existing virtual machine in CloudStack.
Wrapping Up
Thank you for taking the time to read our blog. This blog “Create a Ubuntu Template from the Existing VM in KVM” was written by our cloud engineer Mr. kanagaraj. We hope you found the information valuable and insightful. If you find any issues with the information provided in this blog don’t hesitate to contact us (sales@stackBill.com).
Take a look our next article : How to Create VM using Default Network in ACS?